The critical clearance for the tank is not the top tube, it is where it fits over the cast beam behind the steering head, which is wider than the tube. You are only talking of a difference of 1/16" each side anyway. As you know, it bolts on at the front through a tubular lug cast into the beam. All Greeves had to do was make the lug the same length on all models.
-
-
Thanks everyone! Now back to our regularly scheduled thread.Comment
-
Time to check whether the gearbox sprocket lines up with the rear sprocket. This is with the 3/8 width gearbox and the 1/4 rear wheel sprockets so checking on the inside faces. It's looking pretty good - thanks to Phil Hyde who made the engine plates and spacers. I will be fitting a much smaller rear sprocket anyway as I'm not intending to compete at Red Marley.
I'll be buying one of these: https://simplybearings.co.uk/shop/p2...duct_info.html but am dithering between 51 and 53 teeth - I loike an odd number as it spreads the wear. 51 will give me 12.4 mph / 1,000 engine rpm; 53 will give 11.95 with the 19 tooth gearbox sprocket. Quite low geared but should give a top speed north of 50 which will be fine.
I'll have the sprocket machined by Nametab here in Redditch who give an excellent and good value service.
Comment
-
That sprocket looks huge, just roughly counting the teeth I can see it looks around 80 teeth
Comment
-
Yes, haven't counted them but it would probably give a top speed of about 20 mph....
It will be in a future tranche of surplus bits available for anyone interested.Comment
-
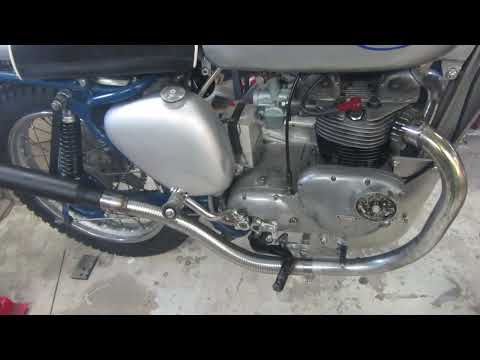
A bit more progress. Oil tank all sorted out and plumbed in (pics to follow as it's on the other side). Chain fitted - it needed a cranked (half) link which was difficult to find. Chinese Mikuni copy carb fitted - no idea whether it will work but the correct monobloc is in a right state and this was only ?16 delivered from China. But the major step forward is starting work on the exhaust - this is the left (drive) side one with the polylock flexible section inserted and a "chopper pot" silencer. I did try a chrome one but it made everything else look too scruffy.
The exhaust is in place but not finally snugged down but I'm pleased with the look and I think I can see how to sort the rear brake pedal out.
Attached FilesComment
-
-
Making good progress Ian. Looking very tidy.Comment
-
Thanks Phil. The other side:
Comment
-
Looks like you are cracking on with this Ian, not much to do now. Be interesting to know how you get on with that Chinese Mikuni, how they make them & post from China at that price I dont know. I bought a carb for a strimmer some time back, same as the original came with spare gaskets and fuel primer 'tit', fuel pipes & filters and also a tool for adjusting mixture all for about ?14. The carb you have looks like the 26mm one advertised for a 125cc pit bikes, so will probably need re jetting, might be a bit on the small side for the Triumph but should give good bottom end pulling, ideal for trials. Getting the larger jets may cost more than the carb though!Comment
-
I've ordered sets of main & slow running jets - again from Chine - for around a tenner all in. As you say, how do they do it? Even accepting low labour costs there's a lot gone into casting and machining which all seem to be of decent quality. But will it run I wonder?
I did have to modify the flange as the hole centres were too close and not in line with the main bore but think there's enough meat left to hold it.Comment
-
I think it's more or less finished. It would be better if I could get it to start......
Comment
-
It's looking good Ian. Not sure about that carburettor though!Comment
-
Oh me of little faith.
A quick sqirt of easy start to wake it up, a bit of oil in the bores to help compression and a squirt of contact cleaner on the points produced this (unfortunately filling the garage with fumes):
Comment
-
Turned out nice Ian. A tidy job.Comment
-
The video we have been waiting for.
Lovely looking bike. Well done.
Now to put some miles on it.
whitehillbillyComment
Comment